
Managing product design
Balancing production and planned efforts
As a staff product designer in various startups, I build designs from the ground up, balancing immediate tasks with long-term goals. I can work several steps ahead of production or juggle multiple features with varying priorities and implementation ETAs.
I needed to design an internal solution to help me quickly map and manage the following:
Current production status
Easily view the end-to-end product flow (aka the live version), including key touchpoints, notifications triggered by user actions, micro-interactions, and content.
Planned efforts and their status
Quickly identify any ongoing efforts before initiating new solutions.
This is crucial for determining whether to replace, complete, or abandon the planned effort.
Managing multiple versions of elements
Develop a clear strategy to manage both short- and long-term versions of elements, ensuring consistency, tracking changes, and aligning with evolving product needs.
Freezing the dev version for updates
Establish a method to lock the design for the dev team, ensuring it stays synced with a specific ticket while allowing me to continue refining the design for future phases.
Start with the ‘No ticket, no design’ rule
Since the pulse of implementation lies in the tickets, I established a rule: No design would be created or modified without a ticket. Whether it was a text update or a new screen, there had to be a ticket detailing the “why” and the “how.”
This approach effectively ended the ‘tiny tweaks‘ I used to make on the fly and consolidated everything into the same pipeline. Assuming small tweaks would be implemented immediately was a mistake. This system helped avoid situations where I thought something was live, but it wasn’t.
Sync tasks with the design workspace
I started by integrating Figma (where the content design lives) and Miro (where the flows are) with the ticket number and a direct link.
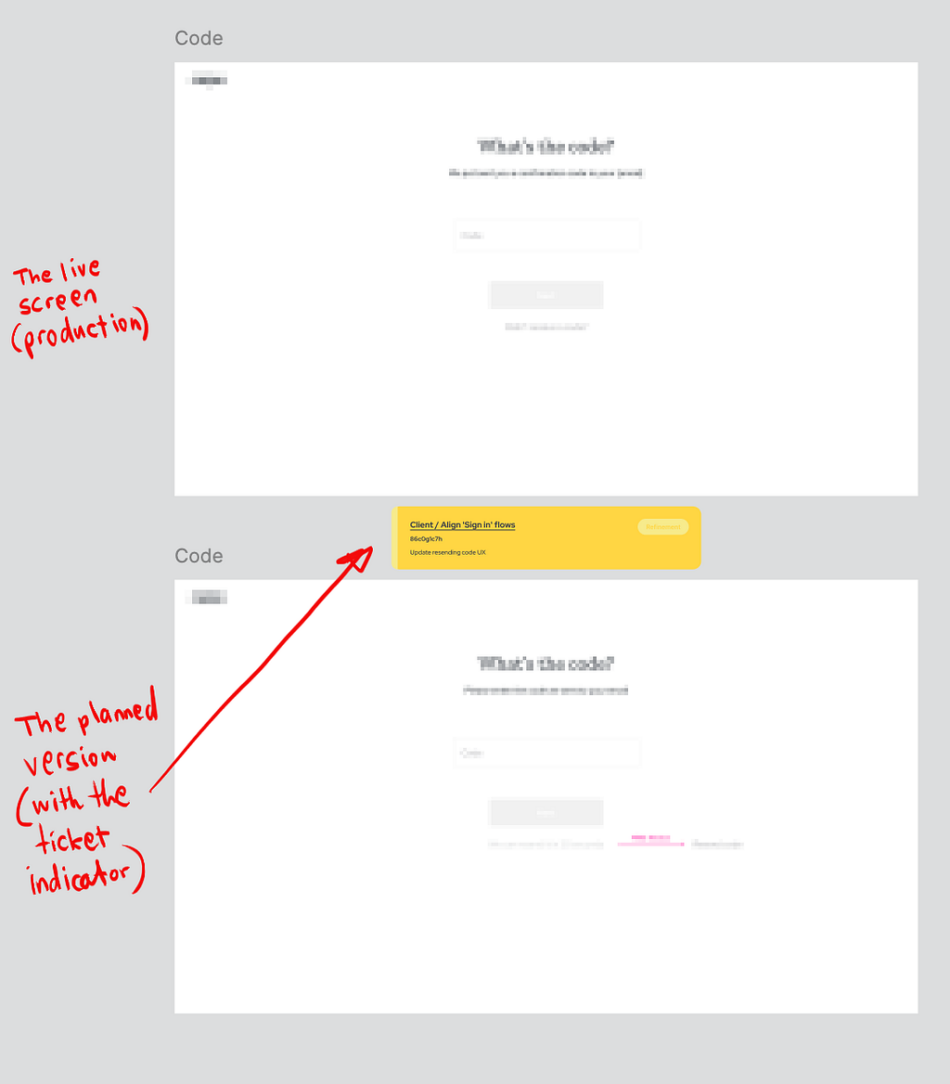
Elements reflecting production had no indication. For advanced versions of the same element, I duplicated a new version below the current one. Above the duplicate, I added a ticket indicator, task name, direct link, and a summary of the changes.
Then, I started working on the design. In other words, I didn’t override the current design with a new one; instead, I kept both versions, one above the other, along with a reference to the detailed ticket.
The top shows the screen as it appears in production (without an indicator). The bottom shows the updated, pending implementation, screen (with the ticket indicator).The first screen shows a new design, the second shows the planned update below the production version, and the remaining three are in production.
In some cases, I didn’t duplicate the design but had a list of open tickets. It’s really about what feels right and does the job.
The ClickUp tickets as shown in Figma — my notes immediately told me what each task was about.
How to create the indicator
I started with a basic indicator I designed. While it indicated an open task and directed to the ticket, it wasn’t updated with the status, and I had to wait for the release note to make the updates. Later on, I discovered that ClickUp (the task management platform I recently worked with) had a great plugin for Figma, integrating the two apps and allowing for status updates with a single click — Ticket Sync. There’s also a built-in integration for Miro.
The great thing about this approach is that it lets you quickly see the efforts for each section of the product and easily zoom in for more details.
Another valuable perk: you can quickly scan the design for specific statuses — such as identifying tasks that need refinement or those already released — for easy comparison with release notes. It also helps map all efforts under the same task by searching for the task ID.
Searching task statuses in Figma for a bird’s-eye view of the implementation progress.The same goes for Miro — the ticket indicates there are changes in the flow. I used red to highlight the changes.
Freeze designs (to keep developers cool)
Once the design was ready for dev, I duplicated it into a dedicated Figma file, naming it with the ticket number. This file is attached to the ticket.
In the dedicated Figma file, new items were marked along with the detailed ticket, while unrelated parts to the specific effort were removed or blurred, making it clear they were not part of the ticket. In other words, it’s a frozen version of the design for the specific ticket, as agreed during refinement.
This approach allows me to continue working on my design while maintaining a single version that includes all design efforts.
As a lead designer in a startup environment, this approach is the key to staying organized and maintaining clear communication in the ever-shifting startup landscape. By linking design work directly to tickets and using a structured workflow, I can stay on top of production while also keeping product managers and stakeholders informed. This system has proven essential in streamlining my design process and ensuring everyone is aligned, helping us move forward efficiently without losing sight of the bigger picture.
Managing product design: balancing production and planned efforts was originally published in UX Collective on Medium, where people are continuing the conversation by highlighting and responding to this story.


